What are conversation objects?
In this article:
- What are conversation objects?
- Navigation
- Object editor
- Message object
- Video object
- Image object
- Link to content object
- Call us object
- Audio file object
- File object
- Email object
- Name object
- Phone object
- Company object
- Multiple choice object
- Open question object
- Choose date object
- Request file object
- Dropdown object
- Conditional logic object
- Restart chat object
- Go to object object
- Appointment object
- Live chat object
- Set custom field object
- GDPR object
- Bot rating object
- Tags object
- Google sheets object
- Team notification object
- External API object
- Notes object
- Mailchimp object
- HaloITSM object
- ActiveCampagn object
What are conversation objects?
When you come to building out your bot's conversation you will have a choice of different objects to use, each of them having a different purpose and use within the conversation. Every object is like a brick to your future conversation. Branch then out, however, you see feet, loop branches if required, and create a unique humanlike experience for your leads.

If we look a little closer at the objects we will find similar attributes.
1. Index.
Every object has an assigned unique (inside the particular bot) number. It really helps to navigate big bots and distinguish the copied objects in search.

2. Connection dots.
These little orange circles indicate the way you can connect the objects. Some objects have only 1 dot, which means that the object can be connected to only one object and others have multiple dots, indicating that the object may be connected using every dot.

3. Start and End indicators.
They look like orange bars under the object with 'Start' and 'End' labels. Every conversation can have only one start and multiple ends. That's why you can't completely remove all objects from the canvas, the starting object can't be removed. But you can re-assign the starting point to another object. Not every object can be a starting point in the conversation (e.g. External API object can't be assigned as a starting point). The objects that can be a starting point will have a play symbol appear while you hoovering over it.

Hovering over the object you will also reveal additional buttons like 'Copy', 'Delete' and 'Select' (for performing bulk actions)
Navigation
All objects in the bot builder are divided into categories by their functional purpose. We have 5 categories:
- Messages - the objects in this category are meant to be informative and don't require a lead to interact with them, they will not stop the flow and will continue to be shown until the end of the flow or until they reach the object that needs interaction.
- Questions - this category has objects that require interaction from a lead. These are objects that actually capture information from lead and they all have the option to save the answer in a custom field. The customer can skip them only if you allow them to do so. Otherwise, the flow won't go any further until a lead answer to the question.
- Paths - the objects in this category are meant to guide your leads to the appropriate branches in your bot depending on the answers they gave you.
- Power ups - this category contains different kinds of objects that don't apply to any other categories. They may be additional functions or extensions that enrich the experience of using our bots.
- Apps - this category contains objects that are connected to separate integration with extended settings. This may be very helpful when you need to filter the leads that are coming from Continually to different systems. Note: You can use them only if your subscription level allows you to use these integrations.

Object editor
Most of our objects have a text area with a universal editor in it. The text area doesn't support any HTML tags. It has basic tools:
- B (bold) - this button makes your text bold
- I (Italic) - this button makes your text cursive
- Emojis - this button opens a flyout menu with the available emojis
- Image - this button allows you to add images to your text area. The supported formats: .jpeg, .png, .jpg, .gif)
- Link - this button allows you to add hyperlinks to your text and makes them clickable. This button works only when you highlight something that should be at the front of your hyperlink. By default, this is the URL link, but it can be also added as an email or telephone number. For them to be clickable you should add them with the appropriate prefix.
- For emails: mailto:test@test.com
- For phone numbers: tel:12345678
- GIF - this button allows you to add shared gifs from websites such as https://giphy.com/
- @ - allows you to use custom fields created in your account inside the text area. Note: you can't just type them, they should be chosen from the drop-down, otherwise they won't be recognized as custom fields.
The other attribute all objects share is the ' Save' button. Make sure you click on it to save all the changes.
'X' button closes the editor without saving any changes.

Message object
The first and most commonly used object in the list is Message. This object speaks for itself and is simply used to send a message. It doesn't require a response from the customer and doesn't stop the bot flow.

You can use all of the basic tools in the message editor text area. One message can be split into a few by activating the 'Separate messages on new line' option. It creates a more humanlike sequence of messages as people tend to chat in short messages rather than long texts. You can also set a delay in the Message editor. By default, the delay for all objects is 2.5 seconds. The delay happens after the object is shown and doesn't apply to the split messages inside the one message object.


Video object
This object is used to share hosted videos with your customers. You can use Youtube, Vimeo, or Wistia URLs. It doesn't require a response from the customer and doesn't stop the bot flow.

This object is pretty simple and doesn't have many settings. You can only set a desirable delay after this object is shown.

Image object
The image object is an easy way to share pictures with your leads. It can be just silly.GIFs for setting the mood, or some informative images. It doesn't require a response from the customer and doesn't stop the bot flow.

This object allows you to either use a hosted image via adding the URL or uploading your own file. Your own file should be bigger than 5 MB. You can also set a delay after showing the image object.
There is also a way to add custom fields to the URL creating Dynamic parameters with values from custom fields. You can read more bout building dynamic URLs here.

Link to Content
Link to content object is used to link your customers to an external page. Simply add your URL and we gather metadata from that page to put together a preview. Leads can interact with the object by clicking the link or CTA button but it doesn't require a response from them and doesn't stop the bot flow.

There is also a way to add custom fields to the URL creating Dynamic parameters with values from custom fields. You can read more bout building dynamic URLs here.

However, we don't load metadata from your website every time we show the URL because it would make bots work slower. So, once loaded, the metadata is stored in our DB. It means that it can get outdated if you change something on your website. Or maybe you simply want to make it a little bit different. You can change all metadata including the title, the description, and the image on the object editor. You should just fill in the appropriate fields in the object editor and the new data will replace the default one in our DB.
You can also add a little Call to action button at the bottom of the preview with a customizable label encouraging leads to click on it. All links open on the new tab.

If you don't like the massive links with metadata, you can always switch to the compact version of the link that looks like just one Call to action button with a customizable label. You can also set a custom delay after the object is shown letting your leads more time for consideration.

Call us
The Call us object is used to let your customers easily dial your number. Leads can interact with the object by clicking the button but It doesn't require a response from them and doesn't stop the bot flow.

You can enter your number and choose the label on the button from "click here to call". You can also set a custom delay after the object is shown.

Audio file
The Audio file object is used for sharing audio files with your visitors. They can be played or downloaded if you allow it. Leads can interact with the object (by playing or downloading the audio file) but It doesn't require a response from them and doesn't stop the bot flow.

There are two ways of adding the file. You can either upload the file (.mp3, .wav) or add an URL to the hosted audio file. The maximum size is 5 MB. You can turn the 'Allow user to download audio file' option on, and it will add a download icon to the object. You can also set a custom delay after the object is shown.

File object
The file object is an easy way to share different files with your leads. Leads can interact with the object (by downloading the file) but It doesn't require a response from them and doesn't stop the bot flow.

You can add a file by uploading it inside the object editor. The button label is also customizable. The maximum file size is 5 MB. We allow the following file formats:
.jpg,.jpeg,.png,.gif,.pdf,.doc,.docx,.ppt,.pptx,.pps,.ppsx,.odt,.xls,.mpeg,.xlsx,.pages,.numbers,.key,.zip,.mp3,.m4a,.ogg,.wav,.mp4,.m4v,.mov,.wmv,.avi,.mpg,.ogv,.3gp,.3g2,.txt
You can also set a custom delay after the object is shown.

Email object
The email object is the most important and essential question object, as it captures the contact data that is the key to converting an anonymous lead into a known lead. This object asks your lead to provide their email address and saves the value in the system @email field and if required any custom field of your design. You can learn more about custom fields here. The placeholder of this object can be customised in the localisation section . By default, this is a required question and it stalls the flow until your lead answers the question.

You can use all of the basic tools in the message editor text area. Since this question stalls the flow, you can allow your leads to skip the question to continue with the flow without providing an email address. You should turn the 'Skip question' option ON to use the feature. There are 2 ways to skip a question (you can use any of them or both):
- Manual. You add a skipping label with customisable text. A lead decides by themselves if they want to skip.
- Automatical. You set a timer to automatically skip the question if it was not answered in x seconds.
You can also set a delay in the object editor. By default, the delay for all objects is 2.5 seconds. The delay happens after the object is answered.
You don't have to do anything for the email to be saved in our system. It is saved automatically in our system field. But if you want to you can create an additional custom field.

Adding a description to the question adds an additional line with smaller letters under the main question.

Reject non-business emails is the Enterprise level feature. If you turn this option ON we will compare all the entered emails to the list of free domains and show leads a customisable error message in case we have a match. You can change the message in the localisation section.
free_email_provider_domains.txt

Name object
The name object helps you to capture the names of your leads. Knowing leads' names allows you to create a more personal experience using your bots and further in your email campaigns. We have a general name field that stores both first name and last name. The full name value is saved in the system @name field and if required any custom field of your design. We also have @first_name and @last_name system fields that store the artificially separated full name. You can learn more about custom fields here. The placeholder of this object can be customised in the localisation section . By default, this is a required question and it stalls the flow until your lead answers the question.

You can use all of the basic tools in the message editor text area.
Adding a description to the question adds an additional line with smaller letters under the main question.
Since this question stalls the flow, you can allow your leads to skip the question to continue with the flow without providing a name. You should turn the 'Skip question' option ON to use the feature. There are 2 ways to skip a question (you can use any of them or both):
- Manual. You add a skipping label with customisable text. A lead decides by themselves if they want to skip.
- Automatical. You set a timer to automatically skip the question if it was not answered in x seconds.
You can also set a delay in the object editor. By default, the delay for all objects is 2.5 seconds. The delay happens after the object is answered.
You don't have to do anything for the name to be saved in our system. It is saved automatically in our system field. But if you want to you can create an additional custom field.

You can restrict the length of the name by turning on the 'Set character limit' option and setting the required number of characters. The error message can be customised on the localisation page.

Phone object
The phone object is the second most important object after the email object and essential question object, as it captures the contact data that is the key to converting an anonymous lead into a known lead. This object asks your lead to provide their phone number and saves the value in the system @phone field and if required any custom field of your design. You can learn more about custom fields here. The placeholder of this object can be customised in the localisation section . By default, this is a required question and it stalls the flow until your lead answers the question.

You can use all of the basic tools in the message editor text area.
Adding a description to the question adds an additional line with smaller letters under the main question.
Since this question stalls the flow, you can allow your leads to skip the question to continue with the flow without providing a phone number. You should turn the 'Skip question' option ON in order to use the feature. There are 2 ways to skip a question (you can use any of them or both):
- Manual. You add a skipping label with customisable text. A lead decides by themselves if they want to skip.
- Automatical. You set a timer to automatically skip the question if it was not answered in x seconds.
You can also set a delay in the object editor. By default, the delay for all objects is 2.5 seconds. The delay happens after the object is answered.
You don't have to do anything for the phone number to be saved in our system. It is saved automatically in our system field. But if you want to you can create an additional custom field.

You can restrict the length of the phone number by turning on the 'Set max number length' option and setting the required number of characters. The error message can be customised on the localisation page.

Company object
The Company object helps you to capture the company names of your leads. Knowing leads' company names allows you to create a more personal experience using your bots and further in your email campaigns and also gather more information about their reliability and solvency. This object asks your lead to provide their company name and saves the value in the system @company field and if required any custom field of your design. You can learn more about custom fields here. The placeholder of this object can be customised in the localisation section . By default, this is a required question and it stalls the flow until your lead answers the question.

You can use all of the basic tools in the message editor text area.
Adding a description to the question adds an additional line with smaller letters under the main question.
Since this question stalls the flow, you can allow your leads to skip the question to continue with the flow without providing a company name. You should turn the 'Skip question' option ON to use the feature. There are 2 ways to skip a question (you can use any of them or both):
- Manual. You add a skipping label with customisable text. A lead decides by themselves if they want to skip.
- Automatical. You set a timer to automatically skip the question if it was not answered in x seconds.
You can also set a delay in the object editor. By default, the delay for all objects is 2.5 seconds. The delay happens after the object is answered.
You don't have to do anything for the company name to be saved in our system. It is saved automatically in our system field. But if you want to you can create an additional custom field.

You can restrict the length of the company name by turning on the 'Set character limit option and setting the required number of characters. The error message can be customised on the localisation page.

Multiple choice object
The Multiple choice object is a universal object for capturing answers to your questions AND guiding the users to the appropriate paths in your bot. This object has multiple points of connection and lets you make a path for every choice. We don't save the values from this object automatically so you can save the value to any custom field of your design if required. You can learn more about custom fields here. By default, this is a required question and it stalls the flow until your lead answers the question.

Question:
You can use all of the basic tools in the message editor text area.
Adding a description to the question adds an additional line with smaller letters under the main question.
Since this question stalls the flow, you can allow your leads to skip the question to continue with the flow without choosing any option. You should turn the 'Skip question' option ON in order to use the feature. There are 2 ways to skip a question (you can use any of them or both):
- Manual. You add a skipping label with customisable text. A lead decides by themselves if they want to skip.
- Automatical. You set a timer to automatically skip the question if it was not answered in x seconds.
You can also set a delay in the object editor. By default, the delay for all objects is 2.5 seconds. The delay happens after the object is answered.

Answers:
Unlike, all the previous question objects, this one provides pre-set answers. The question area has a variety of design options to cater to all your needs.

Functionally, answers can be separated into 2 groups:
- Single choice - this type of answers allows a lead to choose only one answer out of the list. For the single choice objects we save 1 chosen value in a custom field. You can choose icons and their color for every answer for quick navigation between answers. You can learn more about adding icons here.
- Multiple choice - this type of answers allows a lead to choose as many answers as they decide. Instead of icons multiple choice answers have check marks and an additional button to send your answers once they all are chosen. The placeholder for this button can be customised in the localisation section. For the multiple choice, we save all chosen values in one custom field separated by a comma.
Each of them can be presented as a list or as buttons.

You can change the alignment of the answers. There are 3 options: left, center, and right.

Adding a new answer can be done by clicking the 'Add another answer' button, or by simply hitting enter at the end of the last answer. 'x' button removes answers. Vertical six dots are meant for re-arranging the answers.

You can also add custom variables to the answers by clicking '@' button and making them dynamic as the answer will depend on the value inside the custom field.
Open question object
The open question object is a great way to capture any information that may come your way from leads, any questions, or inquiries. This object may capture almost any text (up to 4 MB ). We don't save the values from this object automatically so you can save the value to any custom field of your design if required. You can learn more about custom fields here. By default, this is a required question and it stalls the flow until your lead answers the question.

You can use all of the basic tools in the message editor text area.
Adding a description to the question adds an additional line with smaller letters under the main question.
Since this question stalls the flow, you can allow your leads to skip the question to continue with the flow without providing any answer. You should turn the 'Skip question' option ON to use the feature. There are 2 ways to skip a question (you can use any of them or both):
- Manual. You add a skipping label with customisable text. A lead decides by themselves if they want to skip.
- Automatical. You set a timer to automatically skip the question if it was not answered in x seconds.
You can also set a delay in the object editor. By default, the delay for all objects is 2.5 seconds. The delay happens after the object is answered.

It has two types of appearance. The short form (by default) has a smaller input field and customisable placeholder. You can customise the placeholder right inside the object editor. The long form was created to invite your leads to write more extended replies. It has a more extended input field and the same customisable placeholder. It also has a customisable button label. If you want to use a long-form, all you need to do is turn the 'Use long format answer' option ON.

Even though the amount of characters we allow leads to leave in the field is not restricted (they can send up to 4 MB of text), there are more strict limitations when it comes to the custom fields. The max number of characters we can save in the custom field is 280 characters. And when it comes to custom fields they also can be the subject of integration and the rules for the fields you're sending these values to might be even more strict. So to avoid truncating the values (by default the value will be truncated if it exceeds 280 characters) we created a feature that allows you to restrict your leads from sending too long values in the open question object. If you want to set this restriction you should turn the 'Character limit' option ON and set the value for the number of characters. The error message for the validation may be customised right there in the object editor.

You can also validate the type of the answer you will get from your leads. There are 3 types we allow:
- Any input - this is a default setting that doesn't restrict anything they send.
- Text only - this type allows only letters, digits, and NO special characters
- Numbers only - this type allows only numbers. It's a really convenient way to capture order numbers, numeric tracking IDs, or any other numeric values.
You can customise the error messages right on the object editor.

Choose date object
The choose date object is an easy way to capture dates. We don't save the values from this object automatically so you can save the value to any custom field of your design if required. You can learn more about custom fields here. By default, this is a required question and it stalls the flow until your lead answers the question.

You can use all of the basic tools in the message editor text area.
Adding a description to the question adds an additional line with smaller letters under the main question.
By default, The object asks your leads to choose a date in 3 stages:
- Choose a year from a set of 10 years.
- Choose a month from a set of all 12 months
- Choose a day in a set of the appropriate number of days.
But you can change it by choosing the date format among:
- Year+Month+Day
- Year+Month
- Year
The button label may be customised right there in the object editor
Since this question stalls the flow, you can allow your leads to skip the question to continue with the flow without providing any answer. You should turn the 'Skip question' option ON in order to use the feature. There are 2 ways to skip a question (you can use any of them or both):
- Manual. You add a skipping label with customisable text. A lead decides by themselves if they want to skip.
- Automatical. You set a timer to automatically skip the question if it was not answered in x seconds.
You can also set a delay in the object editor. By default, the delay for all objects is 2.5 seconds. The delay happens after the object is answered.

You can set a restriction on the dates the leads are available to select. For this, you turn the 'Set available dates' option ON and choose the dates range.
Request file object
The request file object is an extremely useful tool for collecting files from your customers. We don't save the values from this object automatically so you can save the value to any custom field of your design if required. We don't save the actual file in the custom field, but an URL for the hosted file. You can learn more about custom fields here. By default, this is a required question and it stalls the flow until your lead answers the question.

The supported file types are : jpg, jpeg, png, gif, pdf, doc, docx, ppt, pptx, pps, ppsx, odt, xls, xlsx, pages, numbers, key, zip, mp3, m4a, ogg, wav, mp4, m4v, mov, wmv, avi, mpg, ogv, 3gp, 3g2, txt.
The maximum file size is 20MB.
You can use all of the basic tools in the message editor text area.
Adding a description to the question adds an additional line with smaller letters under the main question.
Since this question stalls the flow, you can allow your leads to skip the question to continue with the flow without providing any answer. You should turn the 'Skip question' option ON in order to use the feature. There are 2 ways to skip a question (you can use any of them or both):
- Manual. You add a skipping label with customisable text. A lead decides by themselves if they want to skip.
- Automatical. You set a timer to automatically skip the question if it was not answered in x seconds.
You can also set a delay in the object editor. By default, the delay for all objects is 2.5 seconds. The delay happens after the object is answered.

Dropdown object
The dropdown object is a nice way to ask your leads to choose from a long list, like country, city, zip-code, time-zone, etc. We don't save the values from this object automatically so you can save the value to any custom field of your design if required. You can learn more about custom fields here. By default, this is a required question and it stalls the flow until your lead answers the question.

You can use all of the basic tools in the message editor text area.
Adding a description to the question adds an additional line with smaller letters under the main question.
By default, we add a list of countries in the object, but you can add any list of your design. Every new option on your list should start with a new line. You also can add custom fields as options for making dynamic lists.
The button label can be customised on the localisation page.
Since this question stalls the flow, you can allow your leads to skip the question to continue with the flow without providing any answer. You should turn the 'Skip question' option ON in order to use the feature. There are 2 ways to skip a question (you can use any of them or both):
- Manual. You add a skipping label with customisable text. A lead decides by themselves if they want to skip.
- Automatical. You set a timer to automatically skip the question if it was not answered in x seconds.
You can also set a delay in the object editor. By default, the delay for all objects is 2.5 seconds. The delay happens after the object is answered.

Conditional logic object
The Conditional logic object is a very important component for building your bots. It creates logical conditions for leads and guides them in the right branch of your bot. The conditional logic object has two connecting points: 'True' and 'False' paths. It means that one object can direct your leads in 2 directions. The result of this object isn't saved either in a system field or in a custom field. This object works in the background and isn't visible to your visitors, so they will only be directed to the next object in the 'True' or 'False' paths. But on the preview, you will be able to choose the path.

If you don't set any conditions in the object it will guide a lead to the 'False' path, by default.
All available conditions are separated in 4 sections
Custom fields - the content of this section depends on the custom fields you have created in your account. It allows you to set conditions based on the content stored inside your custom fields. By default, we create 3 custom fields for you, but you can remove them and create your own.
- @interests
- @issue
- @requests
Lead attributes - the content of this section is the same for all Continually users and consists of the attributes you capture from leads with our objects:
- Name
- Company
- Phone
- First seen
- Last seen
- GDPR
- Lead tag
Lead context - the content of this section is the same for all Continually users and consists of the attributes, parameters or just some environmental circumstances which are directly or indirectly related to a lead.
- Current URL
- Device
- Referral URL
- Country
- Time of Day
- Day of the week
- Specific day
- Appointment
- Bot
Live chat - is a section of one condition for now, It has a live chat condition that determines the availability of your agents in the Live chat app.

Custom fields.
All conditions for custom fields are the same:
- is - this is a very strict condition and it requires a value to be 100% equal to the provided condition with no additional characters.
- is not - this condition is the opposite of 'is' and it's also very strict. it requires a value 100% NOT to be equal to the provided condition with no additional characters.
- contains - this condition is more agile and allows you to compare parts of value with the provided condition.
- regular expression - this condition is an endless tool for processing inputs from your leads but requires you to know the syntax.
Note: Captured inputs for custom variables are not case sensitive (e.g "Apple" and "apple" will have the same output)

Lead attributes.
This section contains various system fields and parameters with a different set of conditions for each one.
- is known - this condition checks if the email for this lead has been captured in this bot or before
- is not known - this condition checks if the email for this lead has NOT been captured in this bot or before
- contains + [value] - this condition checks if the captured emails contain a certain value
Name
- is known - this condition checks if the name for this lead has been captured in this bot or before
- is not known - this condition checks if the name for this lead has NOT been captured in this bot or before
Company
- is known - this condition checks if the company name for this lead has been captured in this bot or before
- is not known - this condition checks if the company name for this lead has NOT been captured in this bot or before
Phone
- is known - this condition checks if the phone number for this lead has been captured in this bot or before
- is not known - this condition checks if the phone number for this lead has NOT been captured in this bot or before
- contains + [value] - this condition checks if the captured phone number contains a certain value
First seen
- on + [date] - this condition compares the date a lead has been first seen (performed the first conversation) and the date set in the condition and checks that the lead was first seen on the same date as the date set in the condition.
- before + [date] - this condition compares the date a lead has been first seen (performed the first conversation) and the date set in the condition and checks that the lead was first seen before the date set in the condition.
- after + [date] - this condition compares the date a lead has been first seen (performed the first conversation) and the date set in the condition and checks that the lead was first seen after the date set in the condition.
- between + [date] and [date] - this condition compares the date a lead has been first seen (performed the first conversation) and the dates set in the condition and checks that the lead was first seen in between the dates set in the condition.
- is not between + [date] and [date] - this condition compares the date a lead has been first seen (performed the first conversation) and the dates set in the condition and checks that the lead was first seen NOT in between the dates set in the condition.
Last seen
- on + [date] - this condition compares the date a lead has been last seen (performed the last conversation) and the date set in the condition and checks that the lead was last seen on the same date as the date set in the condition.
- before + [date] - this condition compares the date a lead has been last seen (performed the last conversation) and the date set in the condition and checks that the lead was last seen before the date set in the condition.
- after + [date] - this condition compares the date a lead has been last seen (performed the last conversation) and the date set in the condition and checks that the lead was last seen after the date set in the condition.
- between + [date] and [date] - this condition compares the date a lead has been last seen (performed the last conversation) and the dates set in the condition and checks that the lead was last seen in between the dates set in the condition.
- is not between + [date] and [date] - this condition compares the date a lead has been last seen (performed the last conversation) and the dates set in the condition and checks that the lead last seen NOT in between the dates set in the condition.
GDPR
- accepted - this condition checks if a lead accepted your GDPR object
- declined - this condition checks if a lead declined your GDPR object
- skipped/not answered - this condition checks if a lead skipped your GDPR object or simply not answered it.
- accepted or skipped/not answered - this condition checks if a lead accepted your GDPR object OR skipped your GDPR object or simply not answered it.
- declined or skipped/not answered - this condition checks if a lead declined your GDPR object OR skipped your GDPR object or simply not answered it.
Lead tag
- is + [tags list] - this condition checks if the lead has the chosen tag applied
- is not - [tags list] - this condition checks if the lead DOESN'T have the chosen tag applied
User context.
Current URL
- is + [value] - this condition compares the current URL a lead started the bot on and the provided value. This is a very strict condition and it requires a value to be 100% equal to the provided condition with no additional characters.
- is not + [value] - this condition compares the current URL a lead started the bot on and the provided value. This condition is the opposite of 'is' and it's also very strict. it requires a value 100% NOT to be equal to the provided condition with no additional characters.
- contains + [value] - this condition compares the current URL a lead started the bot on and the provided value. This condition is more agile and allows you to compare parts of the URL with the provided value.
Device
- is + [list if devices] - this condition checks if the lead's device matches the device chosen from the list
- is not + [list if devices] - this condition checks if the lead's device DOESN'T match the device chosen from the list
Referral URL
- is + [value] - this condition compares a lead's referral URL and the provided value. This is a very strict condition and it requires a value to be 100% equal to the provided condition with no additional
- is not + [value] - this condition compares a lead's referral URL and the provided value. This condition is the opposite of 'is' and it's also very strict. it requires a value 100% NOT to be equal to the provided condition with no additional characters.
- contains + [value] - this condition compares a lead's referral URL and the provided value. This condition is more agile and allows you to compare parts of the URL with the provided value.
Country
- is + [list of countries] - this condition checks if a lead's country matches the chosen condition
- is not + [list of countries] - this condition checks if a lead's country DOESN'T match the chosen condition
Time of day
- between + [time] and [time] + [timezone] - this condition compares the current time of a day with the set period of time in the condition.
Day of the week
- is + [list of days] + [timezone] - this condition checks if the current day of the week matches the chosen day in the condition with the appropriate timezone
- is not + [list of days] + [timezone] - this condition checks if the current day of the week DOESN'T match the chosen day in the condition with the appropriate timezone
Specific day
- on + [date] + [timezone] - this condition compares the current date and the date set in the condition and checks that the current date is the same as the date set in the condition.
- before + [date] + [timezone] - this condition compares the current date and the date set in the condition and checks that the current date is before the date set in the condition.
- after + [date] + [timezone] - this condition compares the current date and the date set in the condition and checks that the current date is after the date set in the condition.
- between + [date] and [date] + [timezone] - this condition compares the current date and the dates set in the condition and checks that the current date is in between the dates set in the condition.
- is not between + [date] and [date] + [timezone] - this condition compares the current date and the dates set in the condition and checks that the current date is NOT in between the dates set in the condition.
Appointment
- is booked - this condition checks if a lead has an appointment booked in the future to avoid double booking.
- is not booked - this condition checks if a lead DOESN'T have an appointment booked in the future to avoid double booking.
Bot
- has seen + [list of bots] - this condition checks if a lead has been shown the chosen bot. By the shown it means that the bot has actually loaded on the page your lead visited but the lead didn't engage it. It also applies to bots that stay hidden from leads when you use your own button.
- has not seen + [list of bots] - this condition is the opposite of the previous and checks if a lead has NOT been shown the chosen bot. By the shown it means that the bot has actually loaded on the page your lead visited but the lead didn't engage it. It also applies to bots that stay hidden from leads when you use your own button.
- has chatted with + [list of bots] - this condition checks if a lead engaged the chosen bot. By 'engaged', we mean that a lead clicked on a widget or a button and answered at least one question in the bot flow.
- has not chatted with + [list of bots] - this condition checks if a lead didn't engage the chosen bot. By 'engage', we mean that a lead clicked on a widget or a button and answered at least one question in the bot flow
- has completed + [list of bots] - this condition checks if a lead not only engaged the chosen bot but also actually completed the flow. By 'completed', we mean that a lead went through the entire flow of your bot and reached the ending object.
- has not completed + [list of bots] - this condition checks if a lead started but didn't complete the flow. By complete, we mean that a lead went through the entire flow of your bot and reached the ending object. Basically, it's the same condition as 'has chatted with'
Live chat
This section has only one condition for now
Live chat
- availability is online - this condition checks if any of your agents are online or if your current company availability is online
- availability is offline - this condition checks if all of your agents are offline or if your current company availability is offline
- is on - this condition checks if your live chat is turned ON
- is off - this condition checks if your live chat is turned OFF
Groups of conditions
If you want to delete the condition click on the 'Trash' button
If you want to add an additional condition click on the '+ Add condition' button
When you have more than one condition you should set the match ALL or ANY option. This will dictate how the conditions are executed. Match ALL means that every of the below set conditions should be TRUE in order to the whole object to result in TRUE path. Even if one of 10 is FALSE, the whole object will result in FALSE path. Match ANY will result in TRUE path if only one of 10 conditions is true.

Restart chat object
The Restart chat object is a convenient way to prompt your customers to action at the end of your bot flow. It allows you to restart a conversation automatically when a lead reaches the object or suggests they restart/close the conversation themselves. The result of this object isn't saved either in a system field or in a custom field. This object can work in the background and be invisible to your visitors, so they will only see the conversation being restarted or you can choose to show them the options to restart or close the conversation.

By default, the object suggests you to automatically restart the conversation. It doesn't require any settings.

But if you choose the 'Ask users if they want to restart' option you will be presented with a different set of fields and switchers.
'You can use all of the basic tools in the message editor text area.
The Restart button label can be customised inside the object editor. The close button is optional and you can add it by switching on the 'Add close button' option and adding the appropriate button label.
This question stalls the flow, but can't be skipped or delayed.

Go to object
The Go to object is a service object that doesn't really make any difference for your leads but serves as a replacement for the arrows that link objects. When you have a big bot with complicated logic inside of it, you may find yourself in a mess made of arrows without any clue of what links to what. So instead of adding long arrows, we suggest using this Go to object to make the bot look neater and clearer.

The object has only one control. It's a drop-down with the list of objects and a search bar. You can search the objects by their index or by the message.

When you choose the object from the drop-down so that the Go to object would refer to it, the Go to object shows you a copy of the referred object on the canvas tinted in blue.

Appointment object
The appointment object is one of the most popular objects as it allows your leads to book appointments directly to your calendar without your participation. All you have to do is to set available time, duration of meetings, and some rules for scheduling, and we take care of everything else. If you don't want your leads booking appointments without you, you can use the appointment object without connecting a calendar, which would create appointment requests for you. We don't save the values from this object automatically (except for some integrations) so you can save the value to any custom field of your design if required. You can learn more about custom fields here. By default, this is a required question and it stalls the flow until your lead answers the question.

The appointment object has 2 modes: appointment booking and appointment requesting. The appointment booking switches on once you connect your Google or Microsoft calendar. If there are no connected calendars the object shows the appointment request mode. If for some reason (server is unavailable, your authorization token was invalidated, etc) we fail to retrieve events from your calendar and, as a result, are unable to show the available slots, the object falls back to the appointment requesting mode, so that you won't lose your lead.

You can use all of the basic tools in the message editor text area.
Adding a description to the question adds an additional line with smaller letters under the main question.
The object has 3 setting tabs inside of it:
1. Calendar slots
This section contains all your team members (agents), except for bot agents, and you can assign the object to any of them. You can assign the object to either one or multiple assignees. If you choose multiple assignees, the appointment object shows the lead's calendar slots or fallback answers of the chosen agents in the round-robin algorithm. By default, the object is assigned to the owner of the bot.
This tab also contains links to connect your calendars if there aren't any connected.

2. Dates available
This tab has content only for the connected calendars, so for the objects, without calendars, it will be empty. For objects with the connected calendar, this tab will contain a way to restrict your leads for booking too far in advance or even set dates period for booking. This is very convenient if you, for example, don't want to commit to something too far in advance. If you're having a business trip somewhere and only available for the appointments during this period of time.

3. Fallback answers
This tab allows you to add/change/move/remove fallback answers. This is essential for localising your bots and customising labels. This area is pretty much the same as the multiple choice object options.

This object has a lot of labels and they all can be customised on the localisation page. Including dates and time stamps on the slots.
Since this question stalls the flow, you can allow your leads to skip the question to continue with the flow without providing any answer. You should turn the 'Skip question' option ON in order to use the feature. There are 2 ways to skip a question (you can use any of them or both):
- Manual. You add a skipping label with customisable text. A lead decides by themselves if they want to skip.
- Automatical. You set a timer to automatically skip the question if it was not answered in x seconds.
You can also set a delay in the object editor. By default, the delay for all objects is 2.5 seconds. The delay happens after the object is answered.
There are additional options for this object.
- The 'Allow user to propose different time' option adds an additional link to the object that a lead can click and add a message with the proposed time which will be sent to a seller in the appointment request form.
- The 'Show option to add attendees' option adds and an additional link to the object that a lead can click and add emails of the additional appointment attendees. They will all receive the meeting invite to the provided email addresses.

Live chat object
A live chat object is a way to control the live chat field on your sidebar. The live chat field will be revealed only when your lead reaches a live chat object in the bot flow. It also allows assigning new chats to the appropriate agents. This is a service object that works in the background and is not visible to your customers. The result of this object isn't saved either in a system field or in a custom field. It doesn't stall the flow and the only sign of reaching it for leads is the appeared live chat field.

The live chat object will work under 2 conditions:
1. The live chat should be ON in the live settings

2. The live chat should be ON for this particular bot on the bots page

The live chat object can work in 2 modes:
- Unassigned - this mode leaves all newly started chats unassigned
- Specific agents - this mode allows you to choose specific agents that will be assigned with the live chat, should a lead decides to start it. If you choose more than one agent, the chats will be distributed between agents using a round-robin algorithm.

Set custom field object
In custom fields we save the values entered or chosen by your leads. The 'Set custom field' object allows you to set any value to any custom field without your leads seeing it, behind the scenes, so to speak. This is a service object that works in the background and is not visible to your customers. The result of this object isn't saved either in a system field or in a custom field. It doesn't stall the flow.

All you have to do is to choose the required custom field from the list and then add a value you want to populate this field with in the associated field. You can set multiple custom fields in one object. To add more custom fields click on '+Another field' button

GDPR object
The GDPR object is an object the sole purpose of which is to gather consent with your Data Protection Policy and Terms and Conditions. For using this object you will need to provide a link to the place you keep your agreements. We save the values from this object automatically but it isn't shown in the @ menu on the object editor. This automatically saved values used in the Conditional logic object though. So if you need to use the GDPR object value in different objects, you can save the value to any custom field of your design. You can learn more about custom fields here. By default, this is a required question and it stalls the flow until your lead answers the question.

The 'Privacy policy link' field should contain the link to the Agreement.
You can use all of the basic tools in the message editor text area.
Adding a description to the question adds an additional line with smaller letters under the main question.
Both the 'Accept button' and 'Decline button' can be localised/changed right inside the object editor
Since this question stalls the flow, you can allow your leads to skip the question to continue with the flow without providing any answer. You should turn the 'Skip question' option ON in order to use the feature. There are 2 ways to skip a question (you can use any of them or both):
- Manual. You add a skipping label with customisable text. A lead decides by themselves if they want to skip.
- Automatical. You set a timer to automatically skip the question if it was not answered in x seconds.
You can also set a delay in the object editor. By default, the delay for all objects is 2.5 seconds. The delay happens after the object is answered.

Bot rating object
The bot rating object allows you to gather feedback from your visitors about how helpful your bot was. We don't save the values from this object automatically so you can save the value to any custom field of your design if required. You can learn more about custom fields here. By default, this is a required question and it stalls the flow until your lead answers the question.

The overall rating (average score) is reflected on the Bots page per every bot. This helps you to understand your visitors' needs more and re-build your bots appropriately to cover as many questions as possible.

You can use all of the basic tools in the message editor text area.
Since this question stalls the flow, you can allow your leads to skip the question to continue with the flow without providing any answer. You should turn the 'Skip question' option ON in order to use the feature. There are 2 ways to skip a question (you can use any of them or both):
- Manual. You add a skipping label with customizable text. A lead decides by themselves if they want to skip.
- Automatical. You set a timer to automatically skip the question if it was not answered in x seconds.
You can also set a delay in the object editor. By default, the delay for all objects is 2.5 seconds. The delay happens after the object is answered.

Tags object
The tags object is perfect to categorise your leads by applying tags depending on the route they take in the conversation. This object can both apply and remove tags depending on the situation. This is a service object that works in the background and is not visible to your customers. The result of this object isn't saved either in a system field or in a custom field. It doesn't stall the flow and the only sign of reaching it for leads is the appeared live chat field.

This object editor has 2 tabs with the same content. The 'Add tags' tab is for applying tags to leads and the 'Remove tags' tab is for removing tags from leads. Both tabs have a widget that allows you to choose a multiple or single tag. You can also create a new tag using the 'Create tag' button, and edit and remove created tags with the appropriate buttons in from of each tag. There is also a search field that allows you to search for tags if you have too many.

You can see tags on the Leads page and on the lead overview page, we also send tags to some integrations.

Google sheets object
The Google sheet object works as an integration object. This object allows you to create and update new rows in spreadsheets and also retrieve values from spreadsheets using lookup values. This is a service object that works in the background and is not visible to your customers. The result of the lookup can be saved in a custom field. You can learn more about custom fields here. It doesn't stall the flow.

If you don't have the integration connected, you can do it right from the object editor.

You can connect multiple accounts right inside the Google Sheets object and choose between them.

Once your account is connected you will be able to choose a spreadsheet from your account and the required sheet. This action is a great way to add new leads to your spreadsheet or place new orders. You can refresh the list with the 'Sync new sheets' button. If for some reason your Google Drive will be disconnected (e.g. the authorization token gets invalidated). You will be notified by email and the object will have an exclamation mark on it. It means that the object won't be able to do its job anymore until you re-connect the app.

This object can perform 3 types of actions:
Insert new row
This action creates new rows in your spreadsheet every time a lead reaches the object in the conversation. To set the action up, you should choose which columns you will populate. Choose them from the 'Select column' drop-down and add as many as you need by clicking the 'Add another column' button. Then you will need to map each column with the appropriate system/custom field by clicking the '@' button or just typing in the value in the field if it is a static value.

Update a row
This action updates existing rows in your spreadsheet every time a lead reaches the object in the conversation by using a lookup value. This action is a way to prevent creating duplicated rows for the existing leads. To set the action up, firstly you should choose a lookup column from the 'Lookup column' drop-down with the appropriate system/custom field as a lookup value to find a row. You can, for example, choose a column with emails and use the @email system field to search for your current lead in the spreadsheet. Then you should decide which columns you will update with the new values. Choose them from the 'Update column' drop-down and add as many as you need by clicking the 'Add another column' button. Then you will need to map each column with the appropriate system/custom field by clicking the '@' button or just typing in the value in the field if it is a static value.

Get data
This action unlike the previous two, retrieves values from the existing rows in your spreadsheet every time a lead reaches the object in the conversation by using a lookup value. This action is a way to get information for your leads to show them. Like checking their order status by using their order number as a lookup value. To set the action up, firstly you should choose a lookup column from the 'Lookup column' drop-down with the appropriate system/custom field as a lookup value to find a row. Then you should decide which columns contain the information you need and choose them from the 'Get data from column' drop-down. You can add as many columns as you need by clicking the 'Add another column' button. Then you will need to map each column with the appropriate custom field by clicking the '@' button in the 'Save as' drop-down.

Team notification object
This object is a way to trigger a notification about the targeted leads. You can put this object strategically into the sequence and choose an agent or a group of agents to make sure you notify the right person for his lead. This is a service object that works in the background and is not visible to your customers. The result of this object isn't saved either in a system field or in a custom field. It doesn't stall the flow.

The team notification object can send 3 types of notifications:
- Desktop (browser notifications)
- Slack (the integration with Slack should be connected)
You can customize the notification subject in the 'Notification' field. You can add custom fields to the text using '@' button.
There are 3 options to choose who to notify:
- All agents (all the team members inside your company-account will receive the notification)
- Specific agents (You can choose one or multiple agents from the list)
- Custom email (any other email which is not part of your team)

Note:
Sending team notifications to custom emails feature available starting from the Professionals subscription and higher.
External API object
The External API object is an extremely useful tool in retrieving sending and retrieving data from third-party services. It allows you to create custom POST/GET/PUT/DELETE HTTP methods. This is a service object that works in the background and is not visible to your customers. The result of the requests can be saved in a custom field. You can learn more about custom fields here.
Note: output from this object is saved as JSON structure. It can't be used as simply as other custom fields. Make sure to read this more detailed article about External API objects to learn how to build a path to the required value.
It doesn't stall the flow and the only sign of reaching it for leads is the appeared live chat field and the sequence of objects will continue using the creates paths for different types of responses.

As much as it is useful, it is a complex object that requires from you some level of knowledge about the HTTP request methods and their structure.
URL
The first and required field is URL and method. You should add the URL where you want to send the request and choose the method between POST/GET/PUT/DELETE. By default, the method is set to GET.

Parameters
The next thing you will need to add is Parameters. There are two ways to do it.
- Add the parameters directly to the URL.

- Add the parameters into the dedicated area. You should click on the switcher to reveal the fields. You can use custom fields in parameters.

Headers
The next optional thing you can do is to customise headers. If you want to change them, click on a switcher. You can't use custom fields in this section. By default, we send the following headers:
- user-agent
- content-length
- content-type
- x-forwarded-for
- x-forwarded-host
- x-forwarded-proto
- accept-encoding

Body
You can also customise the body of the request in the Customize body section. It's also can be activated by the appropriate switcher. The code inside the body must be written in JSON standard (example: {"email": "{@email}", "name": "{@name}", "custom_variable": "{@customvariable}"}

Test request
We allow you to test your request right on the object editor. It sends a test request using the entered data. Make sure you don't use values from custom fields for the test request as they will be empty for the preview. To make a test request you should click on the 'Send request' button.
Response
Once you click on the 'Send request' button we show you a response field with the response code and the response itself. This is a very convenient way to test and troubleshoot your request.

Response routing
We're changing the conversation flow based on the HTTP status code of your response. There are 4 available statuses:
- 200 - Success
- 400/500 - Error
- Timeout (we will wait for 3 sec before giving up)
- No results
Each of the outputs has a connecting dot that allows you to connect the output with the appropriate object/route.
Additional settings
By default, we combine parameters and body of the HTTP requests in the External API object. It means that parameters values are added to body of the request and body values are added to the query parameters. It works for most of the APIs, but some APIs don't allow extra values in the body, so we added an additional option that would allow you to split parameters and body of the requests and send them appropriately. Just turn it off and parameters and body won't be combined.

Notes object
The notes object is a perfect way to leave notes for your co-workers if you're collaborating on building a bot or just building a complicated bot whose logic needs some explanation. This object can both apply and remove tags depending on the situation. This is a service object that shows notes on the bot-builder canvas and doesn't work in the bot, it just gets skipped in the background and is not visible to your customers. The result of this object isn't saved either in a system field or in a custom field. It doesn't stall the flow.

You can use a limited number of the basic tools in the message editor text area. They're only for the text editing.
The object doesn't stall the flow.

Mailchimp object
The Mailchimp object is a tool to apply your Mailchimp integration in a more precise way. You can put this object to any branch of your bot. It allows you to filter your leads and send only the ones that match your criteria. Keep your mailing list clean and targeted with using this object. This is a service object that works in the background and is not visible to your customers. The result of this object isn't saved in a custom field. It doesn't stall the flow.

This object is an addition to the main Mailchimp integration and doesn't work without it connected. So if you don't have the Mailchimp integration connected, the object will show you 'No account connected' warning in red. And when you open the object it will suggest to connect the integration.


The 'Connect' button will redirect you to the Apps page.
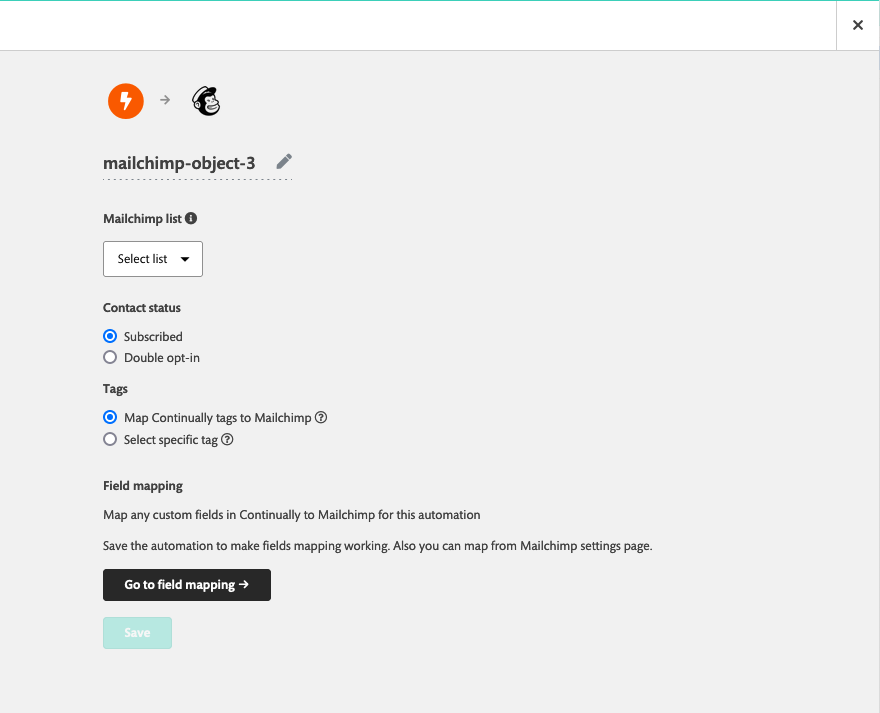
Once the integration connected, the object editor will allow you to configurethe object.
- Name object - you can name the object so that they would be distinguishable on the canvas.
- Mailchimp list - you will have to choose a list where your contacts will land in the Mailchimp account
- Contact status - by default we add new contacts to your lists with the 'Subscribed' status, but you can switch it to the 'Double opt-in' option that will require a confirmation from leads.
- Tags - by defalt we send the new contact ti mailchimp with our own tags and if we don't find the same tags in mailchimp account, we just add them. But you can swicth to the 'Select specific tag' and choose from the list of your Mailchimp tags manually.
- Fields mappning - we don't have a mapping in the object editor, so in order to map them your will have to go to the integration settings and find the appropriate automation.
Note: You need to save the settings in order to create automation. Only then you will be able to find it among the automations on teh integration settings page and change the mapping.

HaloITSM object
The HaloITSM object is a tool to broaden the integration's functionality and to apply your HaloITSM integration in a more precise and effective way. You can put this object to any branch of your bot. It allows you to filter your leads and send only the ones that match your criteria and guide them to the appropriate action. Keep your customer support service neat with this object. This is a service object that works in the background and is not visible to your customers. The result of this object isn't saved in a custom field. It doesn't stall the flow.

This object is an addition to the main HaloITSM integration and doesn't work without it connected. So if you don't have the HaloITSM integration connected, the object will show you 'No account connected' warning in red. And when you open the object, it will suggest connecting the integration.


The object generally has two main options:
- Sync user - this action has more sub-options, all of which are related to creating and updating users and tickets
- Close ticket - this action also has more sub-actions, but all of them are related to closing tickets.

Let's take a look closer to each of them
Sync user
- Name - the form has an editable name line to make it easier for you to navigate between objects on canvas.
- Default client - company name is a required field in HaloITSM system, but it's not required in Continually, so if your lead for some reason doesn't have a company name, it will be assigned automatically with the company chosen in this field.
- Set linked agent - this option allows you to create a new entity (user/ticket) and connect the appropriate agent to it. (you need to map the agents on the HaloITSM integration settings page=> Connect team tab). If this option is OFF, the entities are created unassigned.
- Create new client - this option allows us to create new clients (companies) in HaloITSM if the lead's company name is not found among the existing clients in HaloITSM. If the option is OFF for those whose company names don't match any records, we will assign the default client you've chosen above.
- Add meetings - this option allows us to add appointments we book in Continually to the clients (companies) in HaloITSM

This part of the form is the same for all the actions. Then there's an action picker at the bottom of the form. Depending on the action, there might be additional fields. Let's take a closer look at the section called Tickets:
- Don't create ticket - this is the simplest action that only sends leads to HaloITSM as users associated with the clients (companies) and don't create any tickets.
- Add ticket in HaloITSM for Continually conversations - this action allows you to create a ticket along with the added user. A lead can create one ticket per one conversation. You can choose the following attributes for this action:
- Ticket type - the values are retrieved from HaloITSM
- Ticket service level agreement - the values are retrieved from HaloITSM
- Ticket priority - the values are retrieved from HaloITSM
- Ticket status - the values are retrieved from HaloITSM
- Ticket team - the values are retrieved from HaloITSM (will be added if permissions and rules allow)
- Assigned agent - apart the specific agent, you can choose 'Unassigned' and 'Use agent setting from fields mapping' (will be added if permissions and rules allow)
- Attach appointment to ticket - this option will attach a meeting to a ticket if the 'Add meetings' option is ON
- Flag ticket - adds flags to tickets
- Ticket private note - adds a private note to tickets. You should write it in the text box.
Note:
We retrieve most of the values from HaloITSM and many of them you can reconfugure. But you won't immediately see them updated in the object. To see the updates, you should try re-opening the bot.

- Update previous associated ticket - this option allows you to update the ticket your customer previously created (the last one associated with the user)
- Ticket type - the values are retrieved from HaloITSM
- Ticket service level agreement - the values are retrieved from HaloITSM
- Ticket priority - the values are retrieved from HaloITSM
- Ticket status - the values are retrieved from HaloITSM
- Ticket team - the values are retrieved from HaloITSM (will be added if permissions and rules allow)
- Assigned agent - apart the specific agent, you can choose 'Unassigned' and 'Use agent setting from fields mapping' (will be added if permissions and rules allow)
- Attach appointment to ticket - this option will attach a meeting to a ticket if the 'Add meetings' option is ON
- Flag ticket - it's now one of 3 options:
- Don't change flag
- Flag ticket
- Unflag ticket
- Ticket private note - adds another private note to tickets. You should write it in the text box.

- Update ticket by ID matching a custom field value - this option allows you to update any ticket assigned to the specific lead using a ticket number. They won't be able to update a ticket if the user email doesn't match.
- Custom field drop-down - this is the only field that differs from the previous action. Ask your lead if they know the number of their ticket and if they do, use the Open question object to capture it and save it in a custom field. You should choose this custom field from the list, and we will search for the ticket in the HaloITSM
- Ticket type - the values are retrieved from HaloITSM
- Ticket service level agreement - the values are retrieved from HaloITSM
- Ticket priority - the values are retrieved from HaloITSM
- Ticket status - the values are retrieved from HaloITSM
- Ticket team - the values are retrieved from HaloITSM (will be added if permissions and rules allow)
- Assigned agent - apart the specific agent, you can choose 'Unassigned' and 'Use agent setting from fields mapping' (will be added if permissions and rules allow)
- Attach appointment to ticket - this option will attach a meeting to a ticket if the 'Add meetings' option is ON
- Flag ticket - it's now one of 3 options:
- Don't change flag
- Flag ticket
- Unflag ticket
- Ticket private note - adds another private note to tickets. You should write it in the text box.

Close ticket
This section is pretty simple. It doesn't have many fields and all you have to do is to choose the suitable closing option and name the object:
- Close any tickets created by this conversation - this action allows you to close the ticket created in this conversation.
- Close any tickets for user created by Continually - this action allows you to close all tickets for the user created by Continually (tickets created through different systems or directly from HaloITSM will stay open).
- Close all tickets for user - this action allows you to close all tickets for the user created both by Continually and different systems, including directly from the HaloITSM.

ActiveCampaign object
The ActiveCampaign object is a tool to apply your ActiveCampaign integration in a more precise way. You can put this object to any branch of your bot. It allows you to filter your leads and send only the ones that match your criteria to the appropriate lists. Keep your mailing list clean and targeted with using this object. This is a service object that works in the background and is not visible to your customers. The result of this object isn't saved in a custom field. It doesn't stall the flow.

This object is an addition to the main ActiveCampagn integration and doesn't work without it connected. So if you don't have the ActiveCampaign integration connected, the object will show you 'No account connected' warning in red. And when you open the object it will suggest to connect the integration.


The 'Connect' button will redirect you to the Apps page.
Once the integration connected, the object editor will allow you to configurethe object.
- Name object - you can name the object so that they would be distinguishable on the canvas.
- ActiveCampaign list - you will have to choose a list where your contacts will land in the ActiveCampaign account
Active Campaign integration doesn't have a mapping per automation, so the mapping on the 'Send leads' tab will apply to all the automations.
